Create an admin page
A GreenLight admin page consists of two main parts: a list and a form page. Under the hood both of them utilise Eloquent models, so you will need a working database schema, migrations and the Eloquent models themselves to start working with GreenLight. This package bundles several third party generator components to help you achieve that, so you only have to focus on doing minor adjustments to your models and then create the list and form configuration using YAML.
This section covers the creation of a new admin page in GreenLight, with the following steps:
- Database planning
- Generating migrations
- Generating models
- Creating an admin controller
- Adding a routes
- Creating list and form configs
Of course, this workflow might not be the best fit for your needs. For example, when planning a really small project, you might go for migrations immediately without spending any time with database planning. That is alright. The most important thing is to get an Eloquent model, an admin controller, list and form configs and the corresponding routes for your admin page. This could be achieved in many ways, so the main purpose of this chapter is to provide a well-tested method of the process.
1. Database planning
Let's say you need Database plans for a small project. The idea is to create a mini blog system that supports commenting. Also, posts should be handled in multiple languages. You need an administration interface for this.
To be considered while planning your schema:
- GreenLight uses Laravel-Translatable for translations, which means you will need a separate table with the translated fields (post_translations) connected to your main table (posts)
- Timestamps should be included where you want Laravel to handle automatic timestamps
- Foreign key naming conventions of Laravel should be followed, so our generators can create relationships with less custom code (more information)
As a result, something similar should be fine for a small system like this:
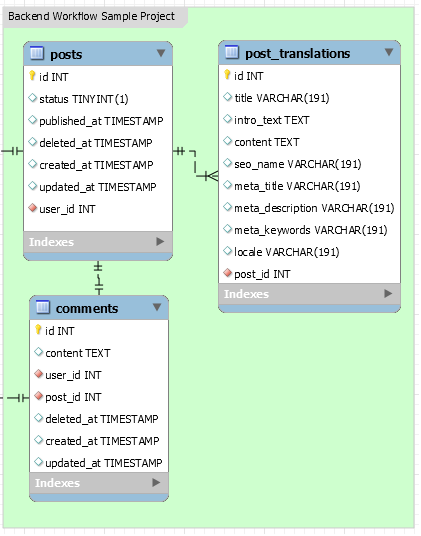
Make sure you create these tables in your database, as in the next step we are going to create migration files for them, which requires them to exist in your data source.
2. Generating migrations
GreenLight uses Laravel Migrations Generator to take some weight off your shoulders regarding migrations, so you would not have to code them yourself.
While generating migrations, it is recommended to not log that to the migrations table first, so you can drop the tables you created earlier and re-create them using your freshly created migrations.
Generating migrations is as simple as running the following command:
php artisan migrate:generate --tables=posts,post_translations,commentsAs a result, you will see your brand new migration files in /database/migrations. In most cases, you will not have
any further things to do with them, although it is always recommended to check any code you generate before using them.
Whenever you are finished, make sure you drop the tables you generated migrations for and re-create them using your
brand new migration files:
php artisan migrate3. Generating models
When your tables and migrations are ready, the next step is generating the Eloquent models of them. GreenLight uses Reliese Laravel for that. Just like before, you will need to run an artisan command to generate a model, but unfortunately this generator will not accept multiple tables as argument, hence you will have to run the command for each table one by one:
php artisan code:models --table=posts
php artisan code:models --table=post_translations
php artisan code:models --table=comments
Reliese Laravel generates code pretty close to what you need, though your models will need minor adjustments in order to work with GreenLight and reduce redundant code:
- Add the admin model trait of GreenLight to your model, right after your namespace definition -
use Greenroom\GreenLight\Traits\AdminModelTrait; - If your model has translated attributes, add a public property named
$translatedAttributesto it (non-associative array, listing the field names) - If you need any validation rules, add a public property named
$validationOptionsin the same format as the default Laravel validation - If you have any fields named
image_src, make sure you remove them from the$fillablesection, image uploading is handled in a different way in GreenLight - Remove casts of foreign keys (
$castsproperty) - Change fully qualified relationship model references to their shorted version wherever it is possible
- Remove unnecessary comments
4. Creating an admin controller
You also need a controller for your CRUD page. In case you want to create one under the
App\Http\Controllers\Admin namespace (make sure you create the Admin folder under app/Http/Controllers), your
code should look like this:
<?php

namespace App\Http\Controllers\Admin;

use App\Models\Post; // could use a different Model namespace, we just preferred to move it under "Models"

class PostsController extends \Greenroom\GreenLight\Controllers\AdminController
{
    public function __construct()
    {
        $this->model = new Post();
        parent::__construct();
    }

}
5. Adding a routes
Whenever you want to be able to visit your admin page, you will need a route for it, so edit your routes/web.php
file. A recommended admin page definer section would look like this:
Route::group([
        'middleware' => ['web', 'greenlightadmin'],
        'prefix' => 'admin',
        'as' => 'admin.',
        'namespace' => '\Greenroom\GreenLight\Controllers'
    ], function () {

    Route::resource('posts', 'PostsController');
    Route::resource('comments', 'CommentsController');

});
This way your admin pages are going to use the same format as other GreenLight admin pages do, while keeping the same authentication methods (although if you want, technically you could change middleware any time, it is up to your implementation ideas).
If everything went well, you should be able to access these admin pages by now (for example /admin/posts). However,
since we have no list or form definitions yet, your admin page is not going to be functional yet.
6. Creating list and form configs
Your admin pages need a data source that contains the fields required for building your lists and forms. The pre-built admin pages of GreenLight already have these YAML config files set up here:
- vendor/greenroom/greenlight/src/Resources/lists
- vendor/greenroom/greenlight/src/Resources/forms
These configuration files you find there are great examples how a form or list definition should look like.
YAML locations
If you want to make your own admin pages, GreenLight is going to look for your YAML config in:
- resources/greenlight/lists
- resources/greenlight/forms
Make sure you name your .yaml files properly according to the model you are going to attach them to. GreenLight expects these config files to be named in snake case format. For example if you have a model named Post, you will need a post.yaml, while a model with the name of MenuItem would require a config file named menu_item.yaml in the location defined earlier.
Format
Obviously, your .yaml configuration files have to follow every convention YAML presents, so GreenLight can parse them. Other than that, there are very few things to keep in mind as the form builder format was designed to be as simple as possible.
These .yaml files hold information about the fields we require the corresponding list / form to build. Item keys contain field names (aliases), the rest hold attribute values in the following format:
Example:
fieldname:
    type: text
    name: 'Name of the field'
fieldname2:
    type: checkbox
    name: 'Name of another field'
    parameters:
        disabled: true
Example #2 (according to the Post model from the previous sections):
id:
    type: text
    name: 'ID'
    parameters:
        readonly: true
status:
    type: checkbox
    name: 'Status'
published_at:
    type: datetime
    name: 'Publish date'
title:
    type: text
    name: 'Title'
intro_text:
    type: textEditor
    name: 'Intro text'
content:
    type: textEditor
    name: 'Content'
seo_name:
    type: text
    name: 'SEO Friendly URL'
meta_title:
    type: text
    name: 'Meta title'
meta_description:
    type: text
    name: 'Meta description'
meta_keywords:
    type: text
    name: 'Meta keywords'
user_id:
    type: fk
    name: 'Created by'
    parameters:
        model: User
created_at:
    type: text
    name: 'Created at'
    parameters:
        disabled: true
updated_at:
    type: text
    name: 'Last update'
    parameters:
        disabled: true
For more information about field types, take a look at the Field types chapter of the documentation.
Legacy mode (deprecated)
If for some reason you can not work with YAML, there is a alternative way to define your list and form configuration, directly in your admin models. Keep in mind that this is considered to be a workaround and is a soon to be removed feature of the package.
If you want to create an admin page without the YAML configuration files, you need to add the $listFields
and $formFields private properties to your model. These properties should be associative arrays holding the
same keys and values that your YAML configuration files would.
An example from a legacy project:
private $listFields = [
    'id'                    => [ 'type' => 'text',      'name' => 'ID',                 'parameters' => []                              ],
    'status'                => [ 'type' => 'checkbox',  'name' => 'Publikálva?',        'parameters' => ['disabled' => true]            ],
    'article_category_id'   => [ 'type' => 'fk',        'name' => 'Kategória',          'parameters' => ['model' => 'ArticleCategory']  ],
    'title'                 => [ 'type' => 'text',      'name' => 'Név',                'parameters' => []                              ],
    'seo_name'              => [ 'type' => 'text',      'name' => 'Keresőbarát URL',    'parameters' => []                              ],
    'created_at'            => [ 'type' => 'text',      'name' => 'Létrehozva',         'parameters' => []                              ],
    'updated_at'            => [ 'type' => 'text',      'name' => 'Módosítva',          'parameters' => []                              ],
];

private $formFields = [
    'id'                    => [ 'type' => 'text',      'name' => 'ID',                 'parameters' => []                              ],
    'status'                => [ 'type' => 'checkbox',  'name' => 'Publikálva?',        'parameters' => []                              ],
    'article_category_id'   => [ 'type' => 'fk',        'name' => 'Kategória',          'parameters' => ['model' => 'ArticleCategory']  ],
    'title'                 => [ 'type' => 'text',      'name' => 'Név',                'parameters' => []                              ],
    'short_description'     => [ 'type' => 'textEditor','name' => 'Rövid leírás',       'parameters' => []                              ],
    'long_description'      => [ 'type' => 'textEditor','name' => 'Hosszú leírás',      'parameters' => []                              ],
    'seo_name'              => [ 'type' => 'text',      'name' => 'Keresőbarát URL',    'parameters' => []                              ],
    'meta_title'            => [ 'type' => 'text',      'name' => 'Title mező',         'parameters' => []                              ],
    'meta_description'      => [ 'type' => 'text',      'name' => 'Meta leírás',        'parameters' => []                              ],
    'meta_keywords'         => [ 'type' => 'text',      'name' => 'Meta kulcsszavak',   'parameters' => []                              ],
    'created_at'            => [ 'type' => 'text',      'name' => 'Létrehozva',         'parameters' => ['disabled' => true]            ],
    'updated_at'            => [ 'type' => 'text',      'name' => 'Módosítva',          'parameters' => ['disabled' => true]            ],
];