Create an admin page
GreenLight admin pages are relatively simple CRUD interfaces using Eloquent models. Form and list views are described with .yaml configuration files based on the following documentation.
This section covers the idea of creating a new admin page in GreenLight, with the following steps:
- Model / database planning
- Generating migrations
- Generating models
- Creating an admin controller
- Adding a routes
- Creating list and form configs
1. Model / database planning
Since Laravel uses Eloquent models by default, we interpret model planning as creating resources for these models, and then the models themselves. As a side note, it is always possible to replace them with any equivalent solution as long as the functions they provide are adequate to work with GreenLight properly.
To be considered while planning your models and schema:
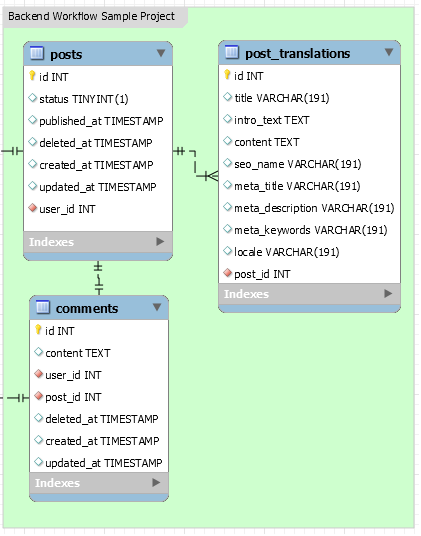
- GreenLight uses Laravel-Translatable for translations, which means you will need a separate table and model with the translated fields (post_translations) connected to your main table (posts)
- Foreign key naming conventions of Laravel should be followed, so our generators can create relationships with less custom code (more information)
A quick example for tables that support models that would work with GreenLight:
2. Generating migrations
GreenLight uses Laravel Migrations Generator to take some weight off your shoulders regarding migrations, so you would not have to code them yourself in case you have a schema built already.
Generating migrations is as simple as running the following command:
php artisan migrate:generate --tables=posts,post_translations,comments3. Generating models
Whenever you have your migrations and tables ready, but still need models to work with, you could use Reliese Laravel, which is already loaded by GreenLight. For this, you could use commands provided by the package like:
php artisan code:models --table=posts
php artisan code:models --table=post_translations
php artisan code:models --table=comments
Reliese Laravel generates code almost ready for GreenLight, although your models will need minor adjustments to work properly and reduce redundant code:
- Add the admin model trait of GreenLight to your model -
use Greenroom\GreenLight\Traits\AdminModelTrait; - If your model has translated attributes, add a public property named
$translatedAttributesto it (scalar array consisting of the field names) - If you need any validation rules, add a public property named
$validationOptionsin the same format as the default Laravel validation - If you have any fields for file uploads, make sure you remove them from the
$fillablesection of the model, so values will be assigned correctly to these fields - Remove casts of foreign keys (
$castsproperty) - Clean your generated code (unnecessary fully qualified references, comments, etc.)
4. Creating an admin controller
To create a GreenLight page, you will need a controller that extends \Greenroom\GreenLight\AdminController.
A quick example of a working GreenLight controller:
<?php

namespace App\Http\Controllers\Admin;

use App\Models\Post; // using the Post Eloquent model for this controller

class PostsController extends \Greenroom\GreenLight\Controllers\AdminController
{
    public function __construct()
    {
        parent::__construct(new Post());
    }

}
By default, a GreenLight admin page consists of a list and a form page with several other actions that support general CRUD processes.
Tree pages
GreenLight list pages can be replaced with tree views. To do this, consider updating the constructor of your Controller with a custom PageConfig (\Greenroom\GreenLight\PageConfig) setup.
Example:
<?php

namespace Greenroom\GreenLight\Controllers;

use Greenroom\GreenLight\Models\Menu;
use Greenroom\GreenLight\Models\MenuItem;
use Greenroom\GreenLight\PageConfig;

class MenuItemsController extends AdminController
{
    public function __construct()
    {
        $pageConfig = new PageConfig();
        $pageConfig->treeViewGroupModel = new Menu(); // Optional, menu items are going to be grouped by Menu models
        $pageConfig->treeViewGroupFKName = 'menu_id'; // Optional, menu items are going to be grouped based on this field
        $pageConfig->indexView = 'tree';

        parent::__construct(new MenuItem(), $pageConfig);
    }
}
5. Adding a routes
Routes are not generated automatically for controllers (except for the ones GreenLight already provide), therefore you will need to add them to your routes file. Make sure you add the "greenlightadmin" middleware alias to your route if you need authentication checks by Laratrust.
Recommended definition method for GreenLight admin routes:
Route::group([
        'middleware' => ['web', 'greenlightadmin'],
        'prefix' => 'admin',
        'as' => 'admin.',
        'namespace' => '\Greenroom\GreenLight\Controllers'
    ], function () {

    Route::resource('posts', 'PostsController');
    Route::resource('comments', 'CommentsController');

});
6. Creating list and form configs
Admin forms and lists are described using .yaml configuration files. GreenLight comes with several pre-built admin pages in, you can check their corresponding configuration here:
- vendor/greenroom/greenlight/src/Resources/lists
- vendor/greenroom/greenlight/src/Resources/forms
These configuration files are a great example how a form or list definition should look like.
YAML locations
If you want to create your own admin pages, make sure you add your own .yaml configuration here:
- resources/greenlight/lists
- resources/greenlight/forms
GreenLight expects these config files to be named in snake case format. For a model named Post, you will need a post.yaml config file, while a model with the name of MenuItem would require a menu_item.yaml file in the locations defined earlier.
Format
Your .yaml configuration files have to follow every convention YAML presents, so GreenLight can parse them. Other than that, there are very few things to keep in mind as the form builder format was designed to be as simple as possible. Item keys contain the names of the fields to be rendered, the rest hold attribute values in the following format:
Example:
fieldname:
    type: text
    name: 'Name of the field'
fieldname2:
    type: checkbox
    name: 'Name of another field'
    parameters:
        disabled: true
Example #2 (according to the Post model from the previous sections):
id:
    type: text
    name: 'ID'
    parameters:
        readonly: true
status:
    type: checkbox
    name: 'Status'
published_at:
    type: datetime
    name: 'Publish date'
title:
    type: text
    name: 'Title'
intro_text:
    type: textEditor
    name: 'Intro text'
content:
    type: textEditor
    name: 'Content'
seo_name:
    type: text
    name: 'SEO Friendly URL'
meta_title:
    type: text
    name: 'Meta title'
meta_description:
    type: text
    name: 'Meta description'
meta_keywords:
    type: text
    name: 'Meta keywords'
user_id:
    type: fk
    name: 'Created by'
    parameters:
        model: User
created_at:
    type: text
    name: 'Created at'
    parameters:
        disabled: true
updated_at:
    type: text
    name: 'Last update'
    parameters:
        disabled: true
For more information about field types, take a look at the Field types chapter of the documentation.